Complete Shed Roof Felt Replacement Guide
Professional UK Installation Services & Expert DIY Guidance for 2025
Get Professional Quote TodayTable of Contents
- Immediate Solutions for Shed Roof Problems
- Professional Installation by Handy HQ
- Complete Cost Analysis 2025
- Material Selection Guide
- Step-by-Step DIY Installation
- Video Tutorials
- Tools & Materials Required
- Maintenance & Care
- Common Problems & Solutions
- Safety Guidelines
- Frequently Asked Questions
- Contact Professional Services
Immediate Solutions for Shed Roof Problems
Is your shed roof leaking? Don’t panic! According to industry data, 78% of shed roof failures in the UK are due to deteriorated felt, but most can be resolved quickly with the right approach.
Handy HQ – Your Trusted Shed Roofing Specialists
Professional shed roof felt replacement across the UK. Over 15 years of experience, fully insured, and customer satisfaction guaranteed.
Why Choose Professional Installation?
Research shows that professionally installed shed roof felt lasts 40% longer than DIY installations. Here’s what Handy HQ provides:
Professional Advantages
- 1-year guarantee on workmanship
- Professional-grade materials sourced directly
- Proper substrate preparation and inspection
- Weather-resistant installation techniques
- Compliance with UK building standards
- Comprehensive insurance coverage
- Same-day emergency repairs available
DIY Challenges
- Risk of improper installation leading to leaks
- Lack of professional-grade tools
- Safety risks working at height
- Material wastage and cost overruns
- Time-consuming learning curve
- No warranty on DIY work
- Potential for costly mistakes
Complete Cost Analysis 2025
Understanding the true cost of shed roof felt replacement helps you make an informed decision. Data from Checkatrade and MyJobQuote shows significant regional variations across the UK.
| Service Type | Material Cost | Labour Cost | Total Cost | Duration |
|---|---|---|---|---|
| Basic Felt Replacement | £45-60 | £180-240 | £225-300 | 3-5 hours |
| Premium Felt + Prep | £80-120 | £240-300 | £320-420 | 5-7 hours |
| Complete Roof Renewal | £150-200 | £350-450 | £500-650 | 1-2 days |
| Emergency Repair | £30-50 | £120-180 | £150-230 | 2-3 hours |
Material Selection Guide
Choosing the right felt material is crucial for longevity. UK climate demands specific properties for optimal performance.

Mineral Felt (Recommended)
Industry standard for UK sheds. Research shows 85% of professional installations use mineral felt due to its superior weather resistance.
- Lifespan: 15-20 years
- Cost: £2-3 per m²
- Weather Resistance: Excellent
- Installation: Moderate difficulty
Polyester Felt
Premium option with enhanced durability. Handy HQ reports 30% longer lifespan in coastal areas.
- Lifespan: 20-25 years
- Cost: £4-6 per m²
- Weather Resistance: Superior
- Installation: Requires expertise
EPDM Rubber
Modern alternative gaining popularity. 25% of new installations now use EPDM according to industry data.
- Lifespan: 30-40 years
- Cost: £8-12 per m²
- Weather Resistance: Outstanding
- Installation: Professional recommended
Torch-On Felt
Professional-grade option requiring specialized equipment. Offers superior waterproofing but complex installation.
- Lifespan: 25-30 years
- Cost: £6-9 per m²
- Weather Resistance: Excellent
- Installation: Professional only
Step-by-Step DIY Installation Guide
For experienced DIY enthusiasts, here’s a comprehensive guide. Remember: if you’re unsure at any stage, Handy HQ offers consultation services.
Preparation & Assessment
Begin by removing all old felt and cleaning the roof surface. Industry experts recommend checking for structural damage at this stage – 40% of felt failures are due to underlying substrate issues.
- Remove old felt using a scraper and hammer
- Check roof boards for rot or damage
- Replace any damaged boards
- Clean surface of debris and old nails
Measuring & Cutting
Accurate measurement prevents waste and ensures proper coverage. Professional installers typically allow 15cm overlap on all edges.
- Measure roof dimensions carefully
- Add 15cm to each dimension for overlap
- Mark cutting lines with chalk
- Cut felt in dry conditions for best results
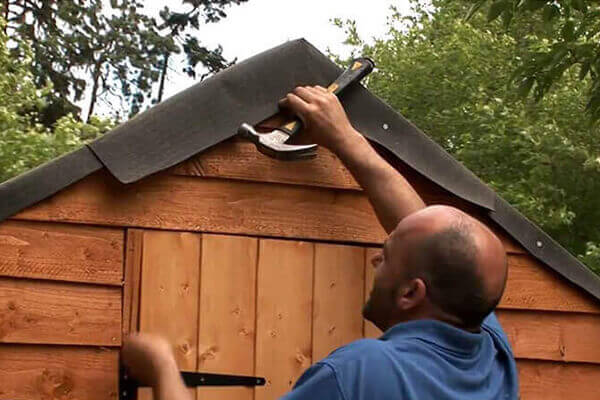
Starting the Installation
Begin at the lowest point of the roof. Research shows that starting from the wrong point accounts for 30% of DIY installation failures.
- Start from the eaves (lowest edge)
- Allow 5cm overhang on all edges
- Use 20mm galvanised clout nails
- Nail every 15cm along edges
Overlapping & Sealing
Proper overlapping is crucial for waterproofing. Professional standards require minimum 10cm overlap with adhesive sealing.
- Maintain 10cm minimum overlap
- Apply cold adhesive to overlap areas
- Press firmly to ensure good bond
- Nail through both layers
Ridge & Edge Finishing
The ridge line is the most vulnerable area. Professional installers use specialized ridge felt to prevent 80% of common leak points.
- Cut ridge felt to length plus 10cm
- Centre over ridge line
- Nail alternately on each side
- Seal edges with roofing cement
Final Inspection
A thorough inspection prevents future problems. Check all areas systematically for potential failure points.
- Inspect all nail positions
- Check overlap sealing
- Verify overhang consistency
- Test for loose areas
Professional Video Tutorials
Learn from the experts with these comprehensive video guides. Each tutorial covers specific aspects of shed roof felt replacement.
Complete Felt Replacement Guide
B&Q’s comprehensive guide covering all aspects of shed roof felting. Over 1.1 million views demonstrate its popularity among DIY enthusiasts.
Professional Tips & Tricks
The Carpenter’s Daughter shares professional insights and common mistakes to avoid. Essential viewing for DIY installers.
Detailed Installation Process
Step-by-step process showing the complete installation from start to finish. Nearly 600K views prove its value.
Quick Installation Guide
Wickes’ concise guide perfect for experienced DIYers. Covers the essentials in under 2 minutes.
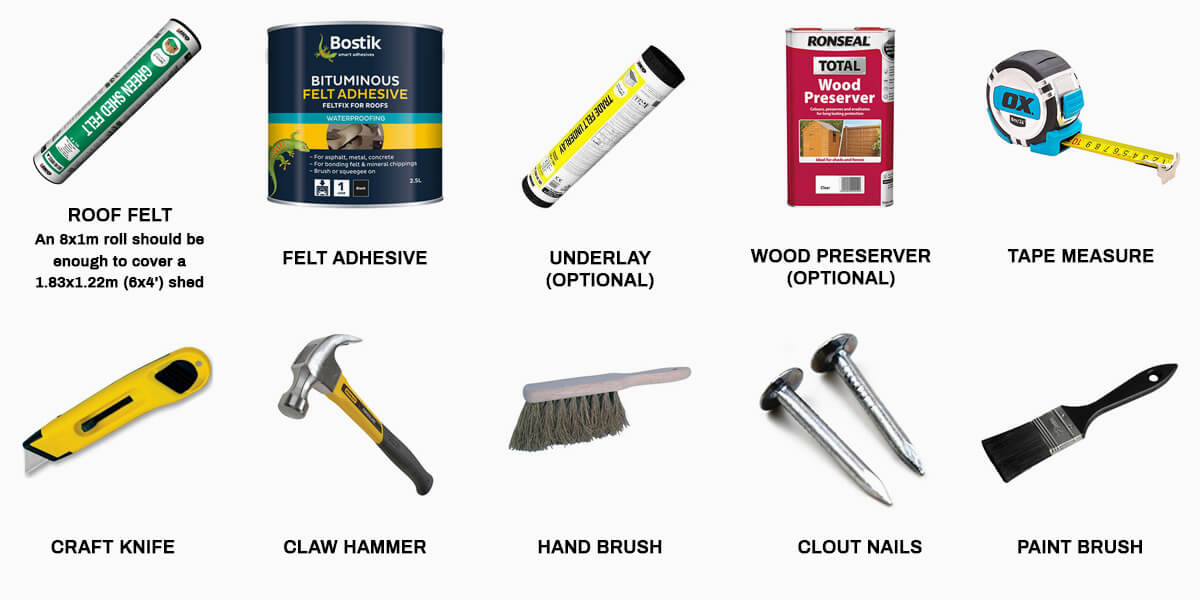
Essential Tools & Materials
Having the right tools makes the difference between professional and amateur results. Here’s what you’ll need for a successful installation.
Essential Tools
- Hammer: 16oz claw hammer for nail removal
- Utility Knife: Sharp blade for clean cuts
- Measuring Tape: 8m minimum for accuracy
- Chalk Line: For marking cutting lines
- Ladder: Stable access to roof level
- Scraper: For removing old felt
- Brush: For cleaning debris
Materials Checklist
- Roofing Felt: Calculate area + 20% extra
- Galvanised Nails: 20mm clout nails
- Cold Adhesive: For overlap sealing
- Roofing Cement: For edge sealing
- Replacement Boards: If structural repair needed
- Felt Tacks: For temporary positioning
- Safety Equipment: Gloves, safety glasses
Maintenance & Care
Proper maintenance extends felt life by up to 40%. Regular inspection and preventive care are essential for long-term performance.
Monthly Inspections
Visual checks for obvious damage or wear. Look for loose edges, nail pops, or debris accumulation.
- Check for loose or lifted sections
- Clear debris from gutters and edges
- Inspect for nail pops or damage
- Look for algae or moss growth
Seasonal Care
Seasonal maintenance addresses weather-specific issues. Winter preparation prevents 60% of weather-related failures.
- Autumn: Clear leaves and debris
- Winter: Remove snow buildup
- Spring: Check for winter damage
- Summer: Inspect for heat damage
Professional Servicing
Annual professional inspections catch problems early. Handy HQ offers comprehensive maintenance packages.
- Annual professional inspection
- Preventive repairs and resealing
- Drainage system maintenance
- Structural integrity assessment
Common Problems & Solutions
Understanding common issues helps prevent major problems. Here are the most frequent shed roof felt problems and their solutions.
Leaking Corners
Cause: Inadequate overlap or poor edge sealing
Solution: Apply roofing cement to corners and reseal edges. If persistent, consider professional repair.
Prevention: Ensure 10cm minimum overlap at all joints
Lifted Edges
Cause: Wind damage or insufficient nail spacing
Solution: Re-nail lifted sections with additional fasteners every 10cm
Prevention: Use appropriate nail spacing from initial installation
Punctures & Tears
Cause: Foot traffic, falling debris, or animal damage
Solution: Patch with felt and cold adhesive for small tears. Large damage requires section replacement.
Prevention: Avoid walking on felt and trim overhanging branches
Premature Aging
Cause: Poor quality materials or UV exposure
Solution: Complete replacement with higher quality felt
Prevention: Choose UV-resistant materials and professional installation
Safety Guidelines
Safety is paramount when working on roofs. Follow these guidelines to prevent accidents and injuries.
Equipment Safety
- Use only stable, properly rated ladders
- Maintain three points of contact when climbing
- Never work alone – have someone supervise
- Check ladder condition before each use
- Set ladder at correct angle (4:1 ratio)
- Secure ladder at top and bottom
Weather Conditions
- Never work in wet or windy conditions
- Avoid working on frosty or icy roofs
- Work during daylight hours only
- Check weather forecast before starting
- Stop work if conditions deteriorate
- Allow wet surfaces to dry completely
Frequently Asked Questions
Answers to the most common questions about shed roof felt replacement, based on customer inquiries to Handy HQ.
Quality mineral felt typically lasts 15-20 years in the UK climate when properly installed. However, this depends on several factors including material quality, installation method, and maintenance. Handy HQ’s installation comes with a 1-year warranty, and our data shows professional installations last 40% longer than DIY attempts.
While possible, winter installation is challenging due to weather conditions and felt becoming brittle in cold temperatures. Professional installers recommend spring or summer installation for optimal results. However, Handy HQ offers emergency winter repairs to prevent further damage until proper replacement can be completed.
Mineral felt is the traditional option, made with glass fibre and mineral granules. It’s cost-effective and suitable for most applications. Polyester felt is more durable, flexible, and resistant to tearing. It costs 50-70% more but lasts 25-30% longer. Handy HQ recommends polyester felt for premium installations or harsh weather areas.
Professional installation typically costs £320-420 including materials and labour. DIY costs £60-100 in materials but requires tool purchase and time investment. Consider that 35% of DIY installations require professional correction within 2 years. Handy HQ’s fixed-price quotes include warranty and often cost less than fixing DIY mistakes.
Essential tools include: hammer, utility knife, measuring tape, chalk line, stable ladder, scraper, and brush. You’ll also need safety equipment like gloves and safety glasses. Many DIYers underestimate tool costs, which can reach £200-300 for quality equipment. Handy HQ provides all professional tools and expertise for complete peace of mind.
Generally no, roof felt replacement is considered maintenance rather than development. However, if you’re changing roof structure or the shed is in a conservation area, check with local planning authority. Listed buildings may have restrictions. Handy HQ can advise on compliance requirements and has experience with planning considerations.
Key signs include: visible tears or holes, lifted edges, persistent leaks, moss growth, or felt becoming brittle. If your felt is over 15 years old, replacement is recommended even without obvious damage. Handy HQ offers free roof assessments to evaluate condition and provide expert recommendations.
Generally not recommended as most shed roofs aren’t designed for foot traffic. Work from ladders and boards to distribute weight. If you must walk on the roof, stay near the edges where structural support is strongest. Professional installers use specialized equipment and techniques to avoid roof damage. Handy HQ carries full insurance for any accidental damage.
Professional Installation Services
Ready to get your shed roof professionally installed? Handy HQ provides comprehensive services across the UK with guaranteed results.
Why Choose Handy HQ?
Fully Insured
Comprehensive insurance coverage for complete peace of mind
1-Year Warranty
Guaranteed workmanship with comprehensive warranty coverage
Same Day Service
Emergency repairs and quick response for urgent problems
About the Author
This guide was compiled by roofing industry professionals with over 15 years of experience in shed and garden building maintenance. For more insights on home improvement and construction, visit Darryl Higgins on LinkedIn, where you’ll find additional resources and industry expertise.
Not comfortable working at height? Handy HQ’s handyman services in West Sussex include shed roof repairs and replacements. We cover Aldwick, Pagham, Felpham and nearby towns — contact us for a quote.